
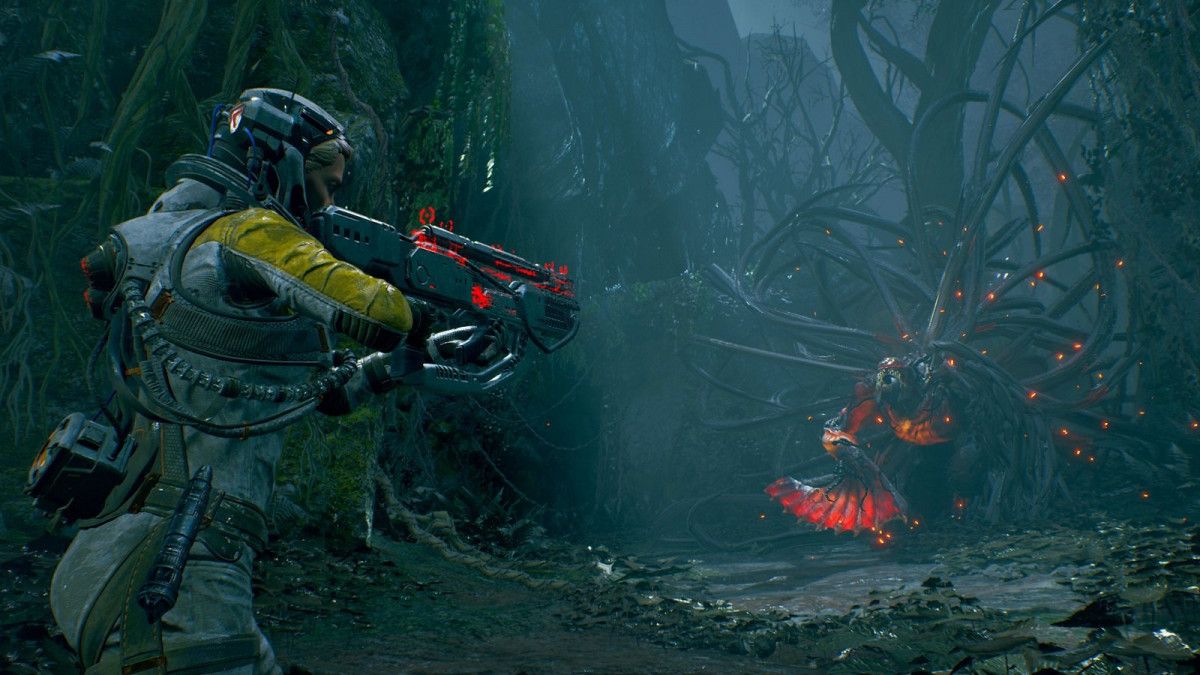
Before the battle with Frika, it is worth preparing and choosing the right weapon. For the first boss fight in Returnal, we recommend using Maw Belcher because it deals a lot of damage with one shot at point-blank range, and during this fight you will have many opportunities to melee the enemy. What's more, the alt-fire mode of Womb Belcher can take away about a quarter of the boss's total health in one fell swoop. It is also worth stocking up on consumables to restore health.
Frika can launch a series of red rockets from three hands. They are not 100% homing, but can change trajectory slightly to hit the target. In this situation, it is best to stop shooting for a while and run to the right or left, and the projectile will fall to the ground.
The second dangerous skill you should be careful with is the glowing orbs that Frika creates above her head and then sends out in all directions. The spheres fly slowly, but after a while gaps appear between them. And you can use them to avoid damage.
Frika can also fire a series of purple orbs, first with her right hand and then with her left two. The projectiles travel at a fairly high speed but are easy to dodge because they are not homing - just run or dodgeto the side.
When Frika begins to focus red energy on the ground, it indicates that he will create a wave of slowly spreading beams, and then rush at you and try to attack in the forehead. Be prepared to dodge to the side just before hitting.
Red energy spreads from the center of the arena to the edges and reaches your positions after dodging, so jump over it to avoid damage.
The last skill that Frika uses during the first phase is a red laser beam, which the boss first drives along the ground, and then makes a quick smooth cut in a straight line upwards - be prepared to dodge to the side.
During the first phase, you should be wary of the combo of two different boss attacks. For example, Fricka can use glowing orbs in combination with a series of red or purple rockets.
During the second phase, Frika gains access to new abilities, some of the previous attacks are changed, and he uses different combos more often, which makes the fight even more difficult. Fricka launches more purple orbs - instead of three, nine will have to be avoided, fired one after the other at very short intervals. Freaka will stand still during this ability, missiles are easy to dodge, so this is the best time to run up to the boss and fire a burst.
Frika will focus energy faster and let out a red l??h not only vertically, but also horizontally. Be prepared to dodge in the opposite direction.
In the third phase, Frika will receive several new attacks, and some of the previous ones will be modified. At this stage, the boss will not let you rest and will fill the arena with many spheres combined into deadly combos - you need to be careful and keep an eye on Selena's health all the time.
At this stage, Frika is much more likely to melee attacks and can hit Selene twice in a row - be prepared to perform two well-timed attacks (immediately before hitting). The boss can launch spheres right on the ground, and they will begin to move towards the side walls. Orbs stay in the arena much longer, but you can maneuver between them. However, it should be noted that Frika still has the basic version of this skill, and he will definitely use it.
Frika can create a series of red rockets above her head and then send them in a chosen direction. In the base version of this skill, missiles are not homing, so they can be easily avoided. When the boss starts to focus energy on the ground, this indicates that he will create two energy waves that spread from the center of the arena to the side walls, and then to Selene. After dodging, head towards the center of the arena, jump up and perform a mid-air blast to jump over two beams and landstay in a safe place.
During the last phase, you will have much fewer opportunities to counterattack. Remember to take your time - focus on avoiding enemy attacks and only shoot when you are sure you are safe.
Before you start the fight, take your time and prepare well, choose the right weapon. If you prefer to fight at close range, you can choose Womb Belcher, although automatic weapons are also suitable for this fight.
Consider carrying at least one large first aid kit, as well as a consumable that will provide Selena with a protective shield. The Ominous Slowstitch parasite is good for this, as it will automatically heal Selene when her health drops to the minimum.
Ixion is a mobile enemy and often moves around the arena using fast dashes. Every time the boss changes position, he releases energy spheres from where the charge starts, and they slowly spread in all directions. Ixion can shoot a cloud of energy spheres at Selene, which will initially fly close to each other, but then the distance between the individual spheres will slowly increase. Run sideways or use dash to avoid damage.
Is it a little harder to dodge an attack in which Ixion releases a fast combo from his hand?About flying projectiles that track Selena's movement. In this case, it is best to run in one direction and not stop until the enemy stops attacking. Ixion can also fire a cone of energy spheres that initially stay close together and then begin to spread apart. This skill covers about a third of the arena and can be easily dodged by sprinting or dashing to the side.
During the second phase, Ixion gains access to new abilities, some of the abilities from the previous phase are slightly modified and he uses different combos more often, which makes the fight even more difficult.
Before the start of the second phase, Ixion will land in the middle of the arena and create a shockwave of red energy that will spread from the center to the end of the arena - just jump at the right moment to dodge it. When the fight starts, Ixion will stand in the middle of the arena and start releasing energy from his body in several ways:
If you lose sight of Ixion, this is a sign that he will soon begin to quickly fly over the arena - each such flight produces a strip of energy spheres in the middle of the battlefield, as well as two blue waves that will spread out to the sides. At this point, it is recommended to stick to the edges of the arena and jump over the waves or dash just before taking damage.
In the second phase, Ixion launches a much longer series of energy spheres that track the movement of the GG. It is best to run in one direction and not stop until the opponent stops the attack. The boss also has a different version of this ability - instead of a single streak of spheres, he can release up to 3 vertical streaks that fly at high speed and track Selena's movement. As in the earlier version, it's best to run in one direction and wait out the shelling.
At this moment, Ixion can launch up to two clouds of energy spheres instead of one, but this is the least dangerous skill of this opponent. Run sideways or dash to avoid damage.
When the enemy starts to float in the air and charge his power, it's a sign that he's about to fire a whole bunch of little glowing missiles at you. They do not track the GG, but towards the end they can slightly change the flight path and, in the end, it is unexpectedly time tofuck Selena. There are two ways to avoid damage: keep running in one direction or make a dash at the right time.
Laser Beam Attack is another special ability that Ixion can activate while in the air. But first, the boss concentrates his energy to deliver a fast linear strike - be prepared to dodge to the side.
During the third phase, Ixion will lose his wings and will no longer fly over the arena. Instead, the enemy will start using completely different abilities. At this stage, the boss will not rest and will fill the arena with a lot of missiles combined into deadly combos and will perform a lot of melee attacks, so you have to be careful and keep an eye on Selena's health at all times.
Before the start of the third phase, Ixion will land in the middle of the arena and create a shockwave of red energy that will spread from the center to the end of the arena - jump at the right moment. The last phase of the duel will start the same way as the second phase, but the orb sequences released by Ixion will be much more difficult and you need to be very careful not to take damage.
At the end of this stage, Ixion will stand in the middle of the arena for about 9 seconds and pull out a blade from his chest, which he will start swinging wildly in different directions. Use the setup time of this attack to deal as much damage as possible.ron. If Ixion is preparing to jump, it's a sign that he's about to lunge at Selene and summon several red energy orbs where he lands - be prepared to dash to the side or accelerate.
When Ixion swings his weapon, he can create a shockwave directly above the ground or at the level of Selene's head - be prepared to jump or dash to avoid taking damage. Ixion can also stop and start slamming his weapon on the ground. Each hit on the ground creates a shockwave at ground level, accompanied by an explosion of red energy spheres. In this situation, it's best to stay on the far side of the arena and jump over the red beam.
The boss can also launch a series of bright red orbs, one after the other. These spheres will fly in a bunch and are easy to dodge by speeding up or making a few dashes. Once the attack is over, Ixion will release several energy spheres in each direction, but the gap between them will be large enough that they can be easily dodged.
In the last stage, you will have much less opportunities for accurate shots, but remember that you do not need to rush - focus on dodging enemy attacks, shoot when you feel safe, and finally defeat the second Returnal boss.
Before you fightwith Nemesis, you need to prepare well and choose the right weapon. Shotguns are less useful in this fight because the boss will keep a distance from Selena. If possible, look for weapons with alt-fire in a straight line - it's much harder to hit the boss's weak spots using projectiles flying in a parabolic trajectory.
It is worth noting that before the boss fight, you will find a good quality modified pistol that will be perfect for this fight. If you don't like conventional pistols, a machine gun is a good alternative.
Consider carrying at least one large first aid kit, as well as a consumable that can give Selena a protective shield. And there will also be a parasite that automatically heals Selena when her health drops to a minimum. Extremely useful are those artifacts that can bring Selena back to life, namely the astronaut figurine and the children's watch.
In the first step, you must aim at the boss's weak spot (the big red spot in the middle). This is the only way you can damage the creature. Two strange creatures floating near Nemesis will join the fight and perform various attacks. Nemesis will shoot a series of blue orbs that can lean slightly to the side, so it's important to stay on the move so you don't get hit by ?distribution. These projectiles aren't particularly fast, so shouldn't pose much of a threat.
Nemesis can also convert energy into a series of small orange projectiles that travel at high speed and may change direction slightly towards the end. When the boss uses this skill, you need to run to the side or dash just before the blow.
Nemesis' next skill is usually combined with a laser attack performed by one of the two levitating creatures. The boss will launch a series of blue orbs that move around the arena from left to right or vice versa. The gaps between the projectiles are large enough to allow you to run between them. The levitating creature will begin to concentrate energy on the floor of the arena, and then strike upwards in a straight line in a quick, fluid motion - be prepared to dodge to the side or run further across the arena.
Creatures accompanying the boss can also fire horizontal laser beams, moving them from one end of the arena to the other - be prepared to dash before taking damage. Nemesis' companion monsters can also concentrate energy in the arena, causing slow moving waves of red energy. The intervals between each attack are long enough for you to jump or dash.
In the second phase, Nemesis will gain access to several new sp?properties, some of the previous attacks are slightly modified. More often, the boss will be assisted by up to four levitating creatures, which will join the fight in pairs, making the fight even more difficult.
Before the start of the second phase of the battle, the arena will split into several smaller platforms, and a boss will appear in front of one of them. If the fight with Nemesis drags on, the boss will start moving between these platforms. As in the first phase, you need to aim at Nemesis' weak spot. Nemesis' combo attack covers a much larger area of the arena. The blue spheres move in three rows, consisting of two lines. Moreover, levitating creatures will launch two laser attacks at the same time - be on the lookout and feel the right moment to dash.
At some point, two creatures will fly into the arena and begin to concentrate energy on the ground, each of which causes three waves of red energy to spread in all directions. When this happens, it's best to stand in one of the corners of the arena and make three quick jumps to jump over all the energy waves.
Nemesis can combine two basic attacks into one - there will be many more blue orbs, but they still move slowly, so they are easy to dodge by using a sprint or a side throw. Horizontal laser beams fired by strange creatures spread a little higher. boo enemieswill move them from side to side, so you have to dodge them twice.
There is another dangerous attack that is hard to dodge. Not only that, Nemesis will release several energy orbs that quickly fall into the arena. After a while, right in front of the arena, the boss will create several condensed waves that will merge together and hit Selene.
During the third phase, Nemesis uses the same abilities, but also gains some new skills, and in addition, the boss is assisted by up to six levitating creatures that join the battle randomly.
This phase begins with a fall from a great height. Your task is to land on one of the levitating platforms. You can control Selena as she falls, or use the Icarus grapple to grab onto the edge of the platform. Platforms are considered solid obstacles, which means boss skills and strange creatures cannot pass through them - they can be used as cover.
It should be noted here that the platforms constantly change their position and after a certain time go down, so you can’t stay in one place. Use the Icarus hook to move between adjacent platforms and get closer to the boss. In Returnal, weapons have a certain effective range, so you won't be able to shoot at the enemy from a very long distance??ia - you simply will not deal damage. The weak point of the boss is still in the same place - you need to focus all your firepower on the bright red dot.
Nemesis can release waves of energy spheres in the form of a whirlwind - the waves move at an average speed and can go one after another or next to each other, thus covering most of the available space. At random times, creatures flying on either side of the boss will join the fight and send yellow or red laser beams towards Selene. You can avoid damage by dashing or moving to another platform.
Nemesis can shoot blue orbs in vertical pillars that will move sideways. The orbs move at high speed and can be dodged by dashing or jumping to another platform.
When the boss's health drops to about a third, Nemesis will push Selena a considerable distance. Your task is to re-close to the enemy, but you must be very careful, as you will be under heavy fire. At this stage of the battle, Nemesis will begin to create a cloud of small orange projectiles flying at a very high speed. The moment the projectiles reach Selena, some of them will break off and aim directly at the heroine - be prepared to rush to the side.
At the final stage of the battle inYou will have fewer opportunities for accurate shots, but remember not to rush - focus on dodging enemy attacks and returning fire when you are safe, and, eventually, you will manage to defeat the third Returnal boss.
The battle with Hyperion takes place near the end of the exploration of the fourth biome on the planet Atropos, known as the Ringing Ruins. Hyperion is the fourth main boss, and defeating him is required to obtain the Broken Key and access the fifth biome. The boss's lair is at the top of the Ringing Ruins, and before you can access it, you need to explore the ruins and find two keys.
Selena must get to the very top, where she will meet Hyperion playing the organ. Jumping into the arena is tantamount to starting a fight. Hyperion has three health bars, so the battle with this opponent is divided into three phases, and each of them is distinguished by unique attack combos.
Before the fight with Hyperion, you should prepare well. The more time you spend preparing, the easier it will be to win. During the battle, we recommend using any weapon of medium or long range. Did I use the Energy Barrier Launcher, a new weapon that is unlocked upon entering the Ringing Ruins.
It is important that Selena has as many points as possiblehealth and increased suit energy. It is also advisable to take some consumables into battle, which should include at least one large first-aid kit. If possible, find a re-enactor in the Ringing Ruins and spend Ether. This will allow you to create a save point and repeat the fight in the same cycle if Hyperion suddenly manages to kill the GG.
From the very beginning of the battle, we will need to dodge slow-moving projectiles and competently maneuver between them, because they will appear in large numbers. Blue projectiles are a big threat. To dodge them, you must jump back at the very last moment. The boss will release a red shockwave from time to time - we can easily jump over it.
Purple horizontal rays are a more serious problem. To avoid them, we need to dash (dodge) to the side with the right timing. If the red wave and purple beams are dangerously close to the heroine at the same time, you will need to jump up first, and then additionally press the side dash button in the air.
The boss will also bombard the arena with various types of projectiles. We need to focus on a proper dash to the side, paying particular attention to dodging the fast moving blue projectiles.
In the second phase of the battle of one ofHyperion's most important new attack is the creation of red vines in the arena. Their arrival is preceded by a red glow, and we will need to quickly rush away from these areas.
Hyperion will also start firing rows of projectiles. In this case, the course of action is quite obvious - we rush forward in order to phase through moving projectiles while dodging and avoid injury.
The shockwaves will become more difficult to dodge, as they will consist of rows of spheres. We must perform every jump flawlessly. Also, consider dashing mid-air to slow down your landing moment and easily jump over each big wave.
During the second phase of the battle, the boss will fire blue projectiles at a faster rate. This time they form a large vertical row of projectiles, followed by "regular" blue projectiles. Avoiding these attacks is easy, just remember to make longer dashes to the side while holding the Circle button.
During the third phase of the fight, the boss will start firing rows of projectiles in the shape of an X. These projectiles are best dodged by jumping and then pressing the dash button in the air. If they fire at several of these rows at the same time, it will be enough just to dodge to the side, remaining in constant motion.
In the last part of the battle, the entire arena can be fired upon with conventional projectiles. Follow their descent and with?Walk in places where they have already hit the ground or won't land at all.
The boss can temporarily restrict Selena's movement field with vines. When this happens, focus on running away from the projectiles flying towards the heroine. Once the vines are gone, run away from the spot and keep wandering around the arena.
Once defeated, the boss will drop 5 Ether and a Shattered Key (found on the ground in the grass) that can be used in the Echo Ruins to unlock access to the 5th biome, the Shattered Wastes. Defeating Hyperion for the first time will also earn the Song of Silence trophy.
Before you fight Ophion, take your time to prepare well and choose the right weapon. You should not take your rifles into this fight, because the boss has really few weak points, and it will be difficult to use weapons for close combat.
During combat, weapons for combat at medium and long distances will work best. We decided to use the Electropylon Driver, which makes it easy to attach projectiles to Ophion's weak spots and maximize damage.
Consider carrying at least one large first aid kit (large flask of silphium), as well as a consumable item that can give Selene a defensive shield to protect herself from the next attack. Parasite (e.g. Sinister Slowstitch or Brittle Slow) that automatically starts to slowly healPicking up Selena when her health drops to a very low level is great for the Nemesis boss fight. Artifacts that can bring Selena back to life, namely an astronaut figurine and a baby watch, are also extremely useful.
During the battle with Ophion, you must aim at the weak spot marked in the picture above. This is the only way you can damage the creature.
In the subsequent stages of the fight with Ophion, protruding elements in the form of red eyes will appear in different places.
Throughout the duel, glowing balls will hover on both sides of Ophion, and you need to shoot them down as quickly as possible (with just one accurate shot) so that they do not interfere with you during the battle - they support the boss and can use various skills. .
Ophion can create portals from which balls of green energy will fly out. The projectiles fall very slowly, and there is a large enough space between them to crash into without getting hurt.
At some point, Ophion may begin to move the levitating spheres from one side to the other, which will create waves of orange energy spheres. The orbs fly in from the sides of the arena and merge in its center - it's best to stand in the center at a good distance from the boss and wait for the orbs to get close, then jump forward a little, bypassing them all.
Ophion can also create a cloud of blue energyballs that travel at high speed and hit the ground with momentum. To avoid damage, you must run sideways or dash at the right time - just before you hurt yourself.
The monster's tentacles hit the ground of the arena from time to time, creating waves of purple-black energy that spread out in all directions. You cannot avoid them by dashing - you must jump over them.
Ophion can also convert energy into a series of small aquamarine projectiles that travel at high speed and may slightly change their direction of flight towards the end. When the boss uses this skill, you need to run to the side or dash right before the attack.
Another skill to look out for during this encounter is the purple beams that cross the arena vertically - just jump between them and wait for them to disappear.
At the end of the first phase of the duel, Ophion can summon portals that will release many orange energy orbs. The spheres will first occupy the entire arena, and then fall into the middle, so it's best to stand at the very end of the location and rush to the side at the right time.
During the second phase of the duel, Ophion will change and start attacking directly, as well as gain access to several new skills and use different ones more often?? combinations of attacks, which makes the fight more difficult.
As you can see in the picture above, in the second phase of the fight, Ophion will create two waves of vertical beams and at the same time perform another attack. Find a safe gap between the beams and wait for the attack.
In this phase of the duel, Ophion can not only attack with his long arms ending in sharp claws, but also slam the ground, creating two waves of purple-black energy. You must jump over each of them, because it is impossible to dash through them without taking damage.
Ophion can also create portals in various places through which he will fire purple beams that will cut through the air diagonally, making him much harder to dodge. The beam only disappears when it reaches the ground.
Purple beams can also appear directly above the arena and move in all directions. Don't forget to jump over them.
When Ophion creates many small portals, it is a sign that the IT is about to launch a wave of fast-moving spheres towards Selene, which partially return to their original position. You can avoid this by dashing just before taking damage.
Ofion can also perform a very complex sequence consisting of as many as three different skills. In addition to slowly falling spheres, purple beams will start shooting from the portals - ?It's best to stay on the edge of the arena.
In the third phase of the duel, Ophion will expand the range of his attacks. At this point, the boss won't give you any respite and will fill the arena with many orbs combined in deadly combinations - you need to be very careful and keep an eye on Selena's health all the time.
In the third phase of the duel, Ophion will use a slightly modified laser attack, and this time he will be able to control it, primarily on the sides. Pay attention to where the rays will intersect, and try to catch the moment to avoid multiple rays at once.
There will be a lot going on on the screen at this point, so you need to keep your eyes peeled. The boss's main attack is to scatter green energy spheres, which he additionally combines with other skills such as waves of purple-black energy.
It's a little harder to avoid a quick attack with blue orbs, but luckily they don't deal much damage on impact.
During the final phase of the duel, you'll have far fewer opportunities to aim, which is why the Electric Pylon Driver is so useful - it deals damage over time and you can focus on dodging enemy attacks. Keep an eye on Selena's health first and foremost, and shoot when you're safe, and eventually you'll be able to defeat the final boss in Returnal.
Warface launches the festive event Triumph in honor of Victory Day: the return of the PvP mode "Arsenal" and a new series of weapons.
The company hopes for a quick resolution to the problem.
FOSSiBOT, a brand founded in 2022 by a team of experts with over 10 years of experience, introduces F112 Pro 5G, the world's first eco-friendly rugged smartphone with a revolutionary approach to design and materials. After two years of development, the company releases a device that combines advanced technology, protection and a responsible attitude to nature.
He will be the last one for the game.
All materials on showgamer.com are protected by copyright. Partial copying is permitted with an open (for search engines) link. ShowGamer (2015)


 Our YouTube channel
 Our VK group

.jpg)
