
PS For the time being, a machine translation of the English-language article is presented to your attention. In the future, we will definitely process the text.
Oxenfree 2: Lost Signals begins with the main character of the game, Riley, waking up under an old lighthouse. Her radio will hum and the voice on the other side will speak. You won't be able to make out much of it, so head up the stairs and up to the graffiti-covered house above you. Enter inside, ignoring the mess, and climb up to the lighthouse. Interact with the tear and go through and you will see a woman watching the sea. Talk to her to trigger a short scene.
Riley will now wake up on a bus stop bench in the city of Kamena. Her radio is buzzing again, and this time it's Evelyn, her new boss. She will tell you details about your new job. It doesn't really matter how you answer, but you can learn more about how certain things will work in the game and find out Riley's backstory and why she's in Kamen.
Evelyn will tell you to go to the general store and grab your climbing gear since you'll be setting up transmitters along the coast. Follow her instructions and head to the general store. She'll take the time to tell you how the walkie-talkie worksso be careful as you will be using it a lot throughout the game.
The General Store will be closed, so call Evelyn on channel 7 and she will direct you to Jacob Summers, your new partner. Head up the hill past the notice board (which you can interact with) and head towards the Copper Creek trail.
Keep following the path up, across the bridge, and then down to the notice board. You will find that Jacob is having problems with the car. Talk to him and then talk to Evelyn on the radio. You can be nice or not, but if you want to befriend Jacob (which several trophies rely on), try to be nice and encouraging with him where possible. His car is wrecked, so you'll have to walk. Jacob has the first transmitter you need, and he will give you a radio with which you can tune in to the local airwaves. This is the essential tool you will need throughout your adventure.
Once you're back on the move, head up with Jacob to the Pemmican Trail, which will take you to a spooky little temple, a ledge you need to jump over, and eventually a couple of benches. Choose to rest with Jacob or keep moving up. On the next screen, you will come to a locked gate. Call Evelyn and she will ask you to be creative, so takeClimb onto the nearest rock, jump over the ledge above, and follow the path until you're on the other side of the gate. Unlock it so Jacob can pass.
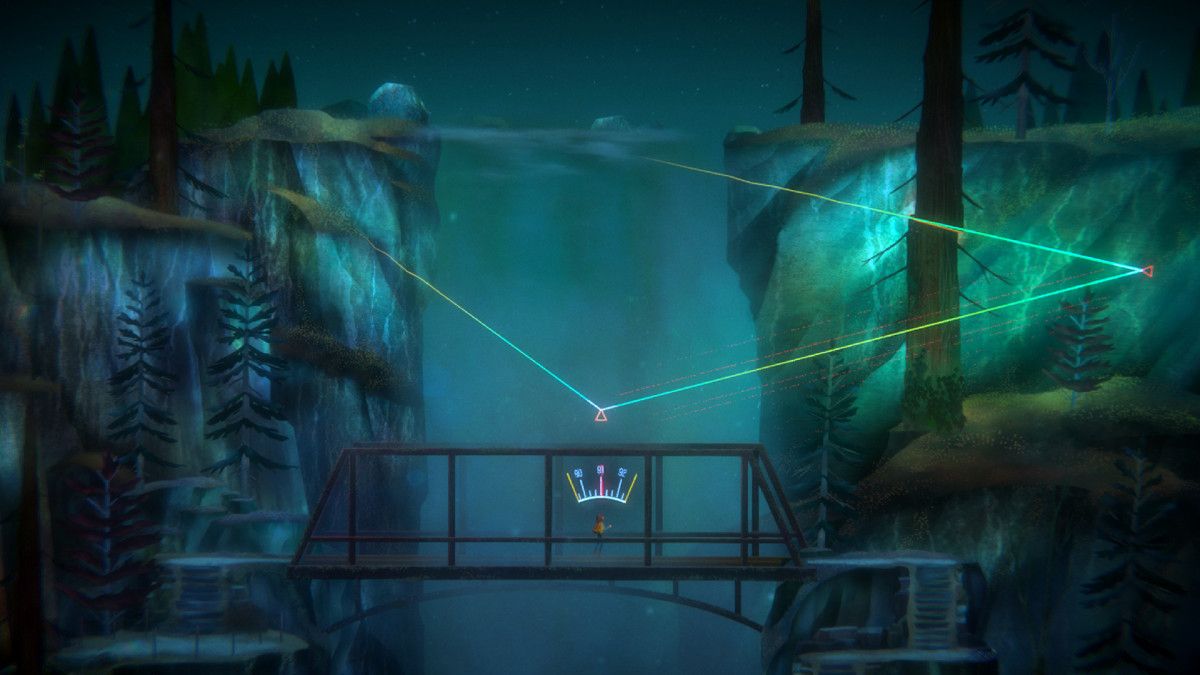
Now you need to go a little further, past an animal burrow that you can interact with (and where the collectible will be later) and you will find a small hideout overlooking Edwards Island. Jump over the railing and go down to the outcrop where you can place the first transmitter. You will need to level the plate, which is a simple case of moving the chopsticks around until the light on the indicator turns blue.
Once the plate is leveled, a short cutscene will play, opening a strange portal over Edwards Island. Riley will now move on to two other destinations where all you can do is select dialogue. The first one is with a little boy, the second one is on the beach with three children in creepy masks, one of which will come to you. After a while, Riley will wake up again on a bus stop bench in the city with Evelyn on the radio.
Riley is surprisingly good at dealing with the time loop, so talk to Evelyn and then head to the General Store. When you approach it, the window will break and a teenager from the beach will walk through it. What would you say to her??, you immediately wake up back on the bench. Go back to see the burning general store where the girl is apparently talking to a glowing red spirit.
When you wake up again, go back to where the general store is still on fire and go right. Now there is a strange car on the bridge. Interact with it to trigger a mini-game where you will need to use both wands to line up the pieces. You will now wake up again and now you need to go back upstairs and instead go left where there is another car. The puzzle is different, but mechanically similar. Solve this one, and everything will return to normal - only Jacob is missing.
You can follow your map back to where you first met Jacob, where you will find him again, freaking out about what happened and trying to fix his car. Talk to him and contact Evelyn. No matter what you say, you will be forced to finish the job, which for now means returning to the first transmitter. Take the radio and return to the hill.
On the way, your walkie-talkie will work, and you can listen to how the three teenagers from the beach are talking - or you can interrupt them, one of them - the ringleader - will call you back and tease you a little. Follow the same path as before, only now the locked gate is unlocked when you get there??Yes. Walk up and up, then find the first transmitter and interact with it.
After some eerie events, Jacob is possessed by a strange spirit and begins to glow red. He will leave, so follow him and when he starts mumbling and Riley says she has to do something, pull the radio with the right trigger. Now you need to tune the radio until you can feel the vibration and hear the static, which should be around 92 - 93. Hold it there and you will notice a small triangle starting to form in the air.
Jacob will also respond. Raise it to 100 and a second triangle will form and Jacob will begin to levitate. At 107.7 a third triangle will appear and create a huge portal similar to the one above Edwards Island. Jacob will fall for free. A strange voice will now speak to Riley, and after a short flashback, you and Jacob will find yourself under a portal with a strange red figure walking towards you. Talk to him or not and you will wake up with Jacob on the edge of the cliff near the entrance to Garland, next to the climbing anchor. You need your climbing gear to use, which you don't already have. First, you will need to make a detour.
Go right and you'll be back at Jacob's truck with a 11:00 PM time stamp. Go straight past the truck and go up the st.?stumps past the bulletin board. Now cross the river using the steps and go straight to Berenson's Creek. Jacob wants to grab some magazines from his "cottage", but first you need to get inside, and he's locked himself in. Classic Jacob!
Even though the solution is pretty obvious (there is a ladder right there), you need to jump through some hoops. First of all, you need to try to get inside, so go to the front of the house and interact with the dog door. Even though it seems like Riley will fit easily, she can't, and all you can do is uselessly interact with the light switch, broom, and garage door opener that are out of reach. Exit, go straight past Jacob and up to the red side door. Interact with it to see that it is locked, but you can now interact with the opened window above.
Go back down, take the ladder, go back to the open window, place it down and go upstairs. Once inside, you can go straight to Jacob or look through his stuff, so go for it. You will find some exposition objects and then go downstairs. His phone will ring and you will receive a creepy phone call meant for Riley.
Now let Jacob in and he will start looking through his journals, eventually findingwhat he needs, and putting together a few theories. In fact, to close the portal over Edwards Island, you need to install three more transmitters, equidistant and at an altitude of 3000m. Luckily, Jacob knows where to get them too.
Use your card to return to the general store. Jacob will guide you after him and find a spare key to get inside, where you will need to blindly interact with the backpack to get your climbing gear. You can now use climbing anchors, which will give you a lot more freedom around Kamena.
Once you get out, go up the hill above you and go straight to the bulletin board. You will see a lone flag, and now you should see something that wasn't there before: a tiny blinking light on the ground. This is your first of thirteen collectibles that help reveal the backstory of Maggie Adler and Edwards Island.
Now, in preparation for the ascent, return to Jacob's hut, this time climb the hill behind it and climb the rock. Continue up to Waterhead Bluffs. Once on the next screen, interact with the climbing anchor to make a path down. You will reach a big chasm and you can either try to jump over it or jump down - either way you will end up in the same place, becausegravity is a bitch. Keep going down and on the left you will see a cave entrance. Head inside.
Go through the small cave and you will find yourself in a mist. On Channel 5, a mysterious person will call you. Talk to him until he leaves and he will be immediately followed by a guy who will introduce himself as Nick Stewart, a local fisherman and retired amateur explorer. Pay attention to him, because he is one of those whose fate will be decided by your actions. You will notice that the fog has cleared, so go downstairs to find a fishing hut that Nick will tell you about. Head inside to find his missing blue backpack, which is part of his "quest" if you want to get him out of here safely.
From the fisherman's hut, back up the climbable wall and go right and then left into the next cave. You will see two climbing anchors above you, which you don't need to worry about yet. Go straight through the cave until you reach broken cables that you can interact with. You will need to go down to the floor of the cave, so keep moving down and to the left until you are next to the water. Turn on the alarm video, so be prepared.
Eventually, you will find yourself under broken cables, which you will find out to be an abandoned elevator from an old mining network. Keep looking for the canary in the cage??e and an anchor for climbing. Use the anchor to go down and you will find a glowing golden tear in the air. At the moment, you cannot interact with it other than to study it. Go right until you reach a cave and Riley will offer to "use" a tear. So go ahead and do it.
You will need to tune the radio to the correct frequency, but once you do, the tear will open. Interact with it to get through and you will find yourself in 1899 when the mine was still in operation.
Continue down the shaft and Jacob will offer to play the One Word Story game. This is a trophy opportunity, but only if you pick the right one word story, so pay attention to the following:
Jacob will begin the story with the word "ONE TIME".
You will now have three options to choose from. You need to select "SANTA".
Jacob will chuckle and then suggest the word "ATE" to continue the story.
You now need to select the "FOURTEEN" option in order to properly progress through the story.
Jacob will suggest the spooky next word "CHILDREN".
Now it's your turn and you need to select "LOUD".
If done right, both of you will remember the dark story "Once Santa at fourteen kids loud".
If you tell this story, you will get the Merry Scary Christmas trophy/achievement.
Come backback and walk past the bird that was replaced with a dead one, suggesting things weren't so good in 1899. You will find that the elevator is working, but the lever is activated from below, so only one of you can ride it. . Lower it and Jacob will go inside, but when you send him upstairs, the cave will start to shake. To get out, Riley will need to jump over the chasm, so send the elevator back up so that its top will block the chasm to put on Jacob. Now quickly go up the stairs, jump towards Jacob and return to the present.
After all that excitement, it's nice to be out on the street again.
While you are climbing the rock, you will be tempted to just keep going up. However, once you're at the top, actually go right and then turn around and go down the slope to the bottom right corner to find a new collectible.
Now climb up to the rock, jumping from point to point, and lower the climbing rope for Jacob using the anchor. Go to the next cave that moves from right to left and climb up the cliff. A few more steps, and there will be a small gap for the jump. Right after you do this, Riley will get scared of the jump and fall, landing below in the darkness.
When Riley wakes up, she will be with her father, quite possibly hallucinatingan old memory of the time before they parted. Just follow the sequence, answering the questions however you see fit, until you eventually climb up the ledge above. As you crawl under the narrow overpass, the image will distort and you will find that Jacob is waiting for you at the stairs.
Once you're back outside, go left and enter the next cave. You will hear on the radio the voice of someone named Violet, Olivia Mussel's friend, the girl who ran into you outside the general store at the beginning. Jacob is aware of Olivia, who is the surviving daughter of the Mussel family, core members of a cult known as Paternity that existed in Kamen for some time. Her parents died in a plane crash and she had to practically grow up on her own.
The cave will push you right out the other side without having to go through it.
As you head up Charity Point, you will notice a ledge of rocks to your right. So before heading left towards Violet, jump right and then down to reach a ledge with a shiny collectible.
Now go back to the left under the small bridge to find Violet, who is being addressed by a glowing red spirit on another bridge just behind it. Hurry up the stairs just in time to ?to see Violet fall to her apparent death.
At this point, the world will be distorted and you will be transported a few meters back. Violet will be on the bridge and Jacob will be sitting next to you on the ledge. Both will have glowing possessed eyes. Run after Jacob, climb the stairs and get ready for a short series of repetitive teen suicides. Tell Violet not to jump when the opportunity arises, but she will jump anyway. Soon after, Riley herself will fall and you will find yourself with dad again.
End the conversation and Riley will return to the present. Jacob and Violet are still possessed, and the latter is now walking along the railing of the bridge. If you climb up and move towards her, she will fall down again, so go past Jacob to the right instead and find another radio tuner. Align the signals and Jacob will return to normal.
Now return to the bridge where Violet is. If you want the best ending, you need to befriend Parentage. You can start by being kind to Violet. There may be several options that work, but during the conversation we chose "Inhale", "It won't let you leave", "Explain how to leave" and "They won't".
When Violet leaves, go back to the right and to the Charity Point where you can place the second transmitter. Align the plate as before and watch the light show. Stroke?Kick on the back and lean down, where you will see another bizarre hallucination, this time a clear flash into Riley's future. When this is done, call Evelyn on channel 7 and let her know your progress.
Climb down and go left, using the climbing anchors you saw earlier to go down the hillside. Turn right and re-enter Berenson Creek. When you return to Jacob's house, you will have another vision, this time Olivia is trying to talk to her parents. It is clear that she misses them and wants to achieve something, or something, which she calls "Glow of the Planets". When the hallucination disappears, you will return with Jacob.
Walk to the right of Jacob's house and exit at Port Tilia. Your destination is Ranger Station, where Olivia sent her other accomplice, Charlie. Climb down using the climbing anchors and you'll spot Charlie. When Jacob gives chase, yell encouragement and follow them. He will go through the archway and close the gate behind him and you won't be able to get through. As with Violet, you need to be nice to Charlie if you want to befriend him. He will run away, but ignore him for now. You have more pressing matters, and you need the key to the ranger station.
Go back to the left, climb the rock on the far side of the falls, and go??e left and down to catch another collectible off the ledge.
Now go up the steps above the waterfall and stop at the bulletin board. Now head straight down the semi-hidden path behind another collectible.
Then return and go up to the Ranger Station. Go inside and find that the Parent has searched it.
You can explore this place a bit, but you will need to use your phone to get ahead. Redial the last dialed number, as other options are a waste of time. A park ranger named Shelley will answer. Tell her you need help and she'll go check something and then come back. She is easy to talk to and will tell you she will help and now you can find her on Channel One. As with Evelyn and Nick, you will need to make the right choice in order to save her. She will tell you where the key is (it's on the board by the phone), so grab it and head back outside.
Go through the locked gate and go right. In the end, you will go down to the beach and cross it under the light of the full moon. This is one of the most beautiful shots in the game, so drink it up. Once you're on the other side, climb up and Jacob will spot Charlie and chase after him again. Unfortunately, the rock he is climbing will collapse and you will be left onbeach. Once you're alone, things start to get creepy again pretty quickly.
You will be contacted by a mysterious caller on channel 2 who wants to play hide and seek. You can refuse the game or even fail it, but if you're trying to get 100% completion, you need to win. Follow the instructions you were given, in particular colder/warmer calls. The first target is the lamp on the far left, just where you came up from the beach. You will then look for an old burnt out fireplace at ground level and finally a cave entrance blocked by a boulder.
Move the boulder and enter the cave, then follow the passage down to find the abandoned shoe. Interact with it to trigger a long flash showing Riley and her possible son Rex. I don't think it's a bad choice here, but after the episode, you will return with Jacob to the beach and he will tell you that he lost Charlie.
Shake it off, climb the rock next to you and keep moving (but dive back into the cave and collect the boot - you'll need it later for extra care). When you get to the next screen, it will be 1 am and you can turn to Shelly for advice, but she will just tell you to stop and smell the roses. Keep going down and Jacob will spot Charlie again and chase him past the old ruins coveredwow graffiti.
When Jacob grabbed Charlie by the neck, he was furious, so you need to talk him into it if you want to eventually befriend Charlie and save him from Olivia's nightmare. In the future, we used the following dialogue options: "Step back, Jacob!", "Tell us what you're up to", "God, you're an ass", "Wow, this is too much!". Now go ahead and interact when you see the words STOP JACOB. Now select "Let me talk to him" and "You will explain tonight" and then "Do you need someone's help?"
Charlie will now become possessed and teleport to the ledge above you. Follow him to find him on a huge bridge, still with red eyes. You need to tune your radio like you did when Jacob was possessed before. Rotate the dial by 92, 101 and 107.7. A triangle will appear and Charlie will fall to the ground.
After talking to the Sunken One a little more, check on Charlie to find out that he is alive, but unconscious. You can't help him, so Jacob offers to continue your mission: install a third transmitter.
Head straight across the bridge and down to find the collectible on the steps below you, then climb back up the steps on the left.
Go to the left of the bridge and climb up the rock. Install the third transmitter at the highest point and level the dish as before. Pass flash forwards, and then??, when you return to today, Jacob will be absent. Don't panic, he's on the bridge, but Charlie is gone. Call Evelyn and let her know, then continue. If you make your way back to the moonlit beach, you'll hear Parentage's radio messages telling you their plan. They intend to build a device to disable your transmitters - for some reason, Olivia is hell-bent on letting the Sunken into our world.
Even though you can access this area before you get to Tuthega Falls, this collectible won't appear until you plant a transmitter there. Once you have done this, you will need to return via Horseshoe Beach. But instead of going straight to the left, go down to where you started the "hot and cold" game earlier. Near where you found the Chimney in that game, on the beach, there is now a shiny collectible.
Parentage appears to operate outside of the city's community center. Now you have a long walk to go as you have to walk all the way back to Uptown Harbor where Riley first woke up on a bus stop bench. At this time, talk on the radio with everyone: Shelly, Evelyn, Nick and, if you can, Maria. Can you promote all of their stories, mutually on a regular basis??acting.
Shelly is brave but will put herself in great danger if you don't stop her; Nick will swim straight into the eye of the storm if you don't give him the knowledge he needs to survive; and Evelyn will lose her sister if you don't talk her into contacting her family. You can't decide everything at the moment, but it's worth remembering to check on everyone as you travel.
The first thing to note about this trophy is that you and Jacob should be good friends at this point. Be sure to do your best during every conversation to be friendly and supportive of Jacob.
After you return from Tutega Falls and head towards the North Carmena Community Center, Jacob will start a conversation. In particular, he will ask you if he can ask you a stupid question. Answer "Of course".
Note: This is the earliest time this conversation can happen, if it doesn't, keep playing and being nice to Jacob and he can say it later, like after the community center event.
He will ask if you want to remain friends after the adventure. Answer "Yes, but it's not a stupid question." After a little chat, he will ask, "What shall we call this new friendship?" and then you need to select "We are 3am Food Friends". After that, the conversation will end and you will receive this trophy.
AND?Turn right from Uptown Harbor and you will be at the gate to the community center. Head inside and go to the upper level where you will find a more powerful radio on a shelf. Go outside through the door on the right and examine the antenna that Olivia built. It's too strong to be broken by hand, so you'll have to turn it off.
Follow down the power cords, looking for various paraphernalia along the way. You will find a room with a poster on the wall and a heavy box on top of the wires. Move the box to find a secret door to the basement. Climb down and destroy all the Parentage crap and then freeze. The kids are upstairs again and Olivia is furious.
You can't avoid getting caught, so just go upstairs and fight them. Olivia will go insane pretty quickly and is backed by the Sunken. Do your best to talk Violet and Charlie in, and Olivia whenever you can. Eventually, however, she will pull out the radio and start trying to tune in to another world. You must stop her.
The community center will distort, tipping over on its side. Ignore any distractions and follow Olivia, interacting with her as quickly as possible three times to stop her from opening the portal. Eventually—if you succeed—gravity will rearrange itself and you will be able to turn off the radio from it. Choose to break it or keep it for yourself - but in?In any case, get ready for some revelations.
This trophy is centered around a key moment in the North Kamena community center when the Sunken Ones show up and Olivia tries to tune in to the Portal. Your job as Riley is to stop her from doing that.
To get this trophy, you need to successfully prevent her from setting up the radio and activating the portal three times. Each time the Community Center will move, knocking the radio to a new location. Get there as quickly as possible to thwart Olivia's plan.
Once you are successful, there will be a lengthy conversation in which you will try to figure out what is going on. Eventually, Olivia will ask for her radio back. When the option to select appears, select [Smash Radio]. This will bring you a trophy.
Like Problem Solved and Destroyed, this trophy is centered around a key moment in the North Kamena community center when the Sunken appear and Olivia attempts to tune in to the Portal.
Note: This trophy is much easier if you have befriended Violet and Charlie. View the walkthroughs for A Brighter Shade of Violet and Charlie's Angel for help. If you're friends, they get in the way of Olivia when she gets to every radio, giving you a better chance.
This time, your task is to flawlessly stop Olive.June. She can start tuning the radio, trying to find the right frequency every time, but she shouldn't have too much time at any given moment to start finding the right frequency to start opening the portal. Once she runs upstairs to grab the radio, follow her using the same ladder on the left, or the right one if you like. Just quickly get to it before the portal starts to open.
Now the house is starting to shake. You need to get to each new radar before Olivia finds the correct channel each time. If you succeed three times, you will receive a trophy.
For the first radio, you need to immediately go to the right and then go out the door to the street. Go down the stairs, and then return to the house, to the temple, to take the radio.
For the next one, go left and then down the stairs to the first floor, then fast left and then up the stairs to the radio station.
In the latter case, the whole house flips ninety degrees and you will need to climb up the railing vertically. Head to the one on your left and interact to get up. Turn right to the stepladder, then go up some more and then go back left to the railing. You will reach a gap in the railing that you will need to jump over. Then jump up to the floor, slide to the right and jump up to get the radio.
Oka?It turns out that Olivia just really misses her parents, and some being from the other side promised her a way to get to them. But it's not the Sunken One - it's actually Alex, the main character from the first game, who is stuck in between and just wants to get out. Olivia and Alex made a deal to send Olivia instead of Alex.
After Alex leaves, you need to leave the Community Center and follow Olivia. She traveled to Garland, an abandoned mining town on the far left of the map. When you get back to Uptown Harbor, Riley confesses to Jacob that she's pregnant - so the boy we saw in the flash forwards is already conceived by this point. In any case, you have one transmitter left, and you have slowed Parentage for now.
Return to Uptown Harbor and you will hear a phone call (this can only happen if you are aware of Shelley's history at the moment). Go left and down to the Funnies parking lot where the pay phone is ringing. Answer it, then call Shelly and convince her not to take the current call. If you let her go, you will lose her. Don't forget to grab the collectible next to the payphone.
Once you're done, go up and to the left, past Jacob's truck and through the tunnel to the Garland Mines. Go down the rise point and climb the rock on the left, and use the radio to break the sake oflock, tuning in to frequency 139. The gate should open and let you through.
When you get to Garland's graveyard, Jacob will offer to climb above the church to install the last transmitter. But it means somehow finding a way into the old mines. Olivia will call you and tease you here, but you can be nice if you're still trying to win her over.
After you've crossed the Garland bridge and entered Garland's ghost town, head to the top left area and you should find a church. There is also a cemetery here. Go through the graveyard, up the steps and to the flashing object on the floor. Go and get it
Go down to the NWMA building and look out for strange cars scattered around. Olivia will call here a second time. Defeat her and then head down the stairs. To the right is an abandoned post office. Go inside and you will be contacted by Hank, the guy in charge of the machines. He tried to photograph the anomalies and the affected wildlife. His machines are called EMF Amplifiers, and they can open small time rifts like the one in the mine before. He will let you use them, but will also ask for a favor: he wants a picture of something alive outside of the time gap.
To complete this trophy, you need to pick up an item. you can getswear it long before you talk to Hank on the walkie-talkie for the first time. At Horseshoe Beach, where you play hot and cold with someone on line 2 of your walkie-talkie, this will eventually lead you to a cave. If you enter there, you can interact with the boot, which will trigger a scene with Rex on the beach. When you come to your senses and can continue on to Tutega Falls with Jacob, you will really want to go back to the cave. Walk through it to find a boot and pick it up. You can technically come back any time after that to do this, but it makes sense to do it now as we pass by.
Much later in the game, when you find yourself in the ghost town of Garland, you can explore the building in the lower right corner of the town. This will be the postman's office. Upon entering, you will be greeted by a flash, and then Hank will contact you to inform you that he is investigating strange events. As payback for disrupting his work, he asks if you could do him a favor and take a picture of something strange to him. Agree to do so. Jacob will say that this sounds like a bad idea, but he will say: "Well ... Maybe." Then interact with the device in the house to turn it on.
Use your spell on the rift to open it - you still need to do it to advance the story. Then you need to use EMF transmitters to change?? the year to which a tear will carry you. The one next to the gap changes the century, and the one up the stairs from you changes the decade.
The year you want to help Hank is 1930. So make sure the EMF transmitter at the top of the stairs is set to "3" and the one by the tear is set to "9". Then enter the tear. A man should be sitting next to the building. Ask Jacob to take a picture while interacting with the man. Get out of the tear and you can call Hank. After several conversation options, Hank will wish he had more concrete evidence, so answer "Do I have a shoe?".
He will accept your offer and ask you to leave it in the safe at the post office. Get back there and do it. Then talk to Hank one last time and he will introduce his wife, after talking to her Hank will be grateful and you will finally see the trophy pop up.
The machine at the top of the stairs controls the century, and the machine at the bottom controls the decade. You cannot set the millennium or individual year. Set the date to 1890 and then go through the tear. You will now be able to cross the bridge and enter the mines, where an exit awaits you. Come out today.
Follow the shafts up, all the way up, and then when you can, go right to exit outside, above the chapel. You will need to jump to the top of the stack and climb to the very top. Oops, when will you install the transmitter, Jacob Provo?It crawls through the rotting roof. Falling far, so you better get down and see if he's okay.
Jump down and lower the rope into a pile. Now descend an incredibly long distance and you will find yourself in the middle of a spooky old chapel. Four candles, but only one burns. Take another candle from the back of the chapel and light them in the correct order. Failure will force you to start again. There is actually a solution in the little window above you, but you need to light them in the following order: bottom left, top left, bottom right.
As soon as the candles are lit, the Sunken Ones will attack you. Fight them off using the frequency converter that appears in front of you. Align the waves as before to silence the Sunken and save Jacob.
Now you need to climb up the rope again and align the transmitter dish to finally complete the task. So that's it, right? All four transmitters are placed and activated, and the radio waves are triangulated - so the Sunken One should disappear and you can relax, right? Well, for a few moments, yes. But it doesn't last long.
Return to Uptown Harbor and get ready to spend the rest of the morning with Jacob until you reach the bridge. At this point, Jacob will be possessed by Alex, who will tell you that this is not the end. The Sunken Manipulated Olivia when shethought she was talking to Alex and they would be here any minute. Olivia traveled to Edwards Island to use the radio tower to fully open the portal.
Return to the harbor and go down to the pier. You need a boat if you're going to follow Olivia. Luckily, the little boat belongs to Jacob's friend and he knows where to find the key. Head back up the steps and go to Eva's Got Worms Lure Shop, which is thankfully open. Enter, take the key and return to the town square, where an unexpected friend will appear: Jacob's dog Athena, whom he has been worrying about all night.
Whether you choose to pet Athena or not, you will get the trophy, but you can't get both in the same playthrough without reloading the last autosave and replaying the section. Jacob is so happy to see her that he immediately ties her to the bus stop as a sacrifice and prepares to leave with you while reminding you to the point of annoyance that this is it: this is your last chance to tie yourself free. ends before you head to Edwards Island. Call everyone you haven't called yet and see if you can finish their stories before continuing.
You need to go back to Jacob's Hut in Tilia Port. Under Jacob's Hut you will see a path leading to a metal building on the right. outside metalThe building will have the last collectible on the floor. Take it for an emotional conversation with Jacob.
When you get to the boat, you will have the choice to either take Jacob with you or force him to stay with Athena. If you leave him behind, he won't be able to influence the ending. If you take him, he will talk to you along the way. If you leave him, Alex will appear instead and talk to you. Whatever you choose, here it is: so tie those loose ends together first!
When you get to Edwards Island, follow the path up and to the right until you reach the beach, where Alex and her friends are still in their time loop. Alex is perceptive and will guide you to the radio tower, where Olivia is still eager to bring the Sunken. Climb the radio tower and demand that the Sunken release the girl. They won't, and Riley will be transported to a strange dark world.
Keep walking to the right until you reach a chair that looks like your father's chair. Sit in it and watch a creepy video, and when you wake up, tune the radio to 101 next to the lamp. You will now return to the lighthouse from the very beginning of the game. Climb up it to find young Maggie Adler at the top. Talk to her until you are forced to return to the dark world.
You are now in a fancy room with four TVs, three of which are lit up.i am red. Tune the radio next to each of the glowing TVs to the following frequencies: 90.7, 105 and 96. After a short cutscene, you will find yourself under a red light. Tune the radio to 101 and you'll wake up in a fishing hut where you'll find an adult Rex.
Talk to him and he will give Riley some wise advice. When you get an option, select (This is not enough) and then "Do something". Rex will now send you back to the present. Now you need to tune the radio again in order to defeat the Sunken Ones and free Olivia. Set it to 79.7, then 121, 94 and 79. The sunken ones will be defeated and you will be faced with the final choice.
Even though the Sunken have left, the portal is not completely closed. To free Alex and her friends, someone has to cross over. If Jacob is with you, you can ask him to do this, and if you are friends now, he will gladly go. Or you can send Alex condemning her forever but saving you all. You can also donate to Riley, but that would take away her future with Rex. Finally, there is Olivia, who has decided to go through with it and stay with her parents.
Whatever you choose will effectively end the game, leaving only a few final cutscenes, followed by a review of all the choices you've made and how many others have made the same. I decided to skip Olivia, which allowed Riley to return to Kamena, where I decided to quit her job. She is also onspoke to a freed Alex and freed Jacob before starting a mostly happy life with her son. Whatever you choose, congratulations, you've completed Oxenfree 2: Lost Signals.
Warface launches the festive event Triumph in honor of Victory Day: the return of the PvP mode "Arsenal" and a new series of weapons.
The company hopes for a quick resolution to the problem.
FOSSiBOT, a brand founded in 2022 by a team of experts with over 10 years of experience, introduces F112 Pro 5G, the world's first eco-friendly rugged smartphone with a revolutionary approach to design and materials. After two years of development, the company releases a device that combines advanced technology, protection and a responsible attitude to nature.
He will be the last one for the game.
All materials on showgamer.com are protected by copyright. Partial copying is permitted with an open (for search engines) link. ShowGamer (2015)


 Our YouTube channel
 Our VK group

.jpg)
