")
Talk to the woman, examine the suitcase, pick up a baby bottle and a box of matches. Look into the stroller, pull the blanket and pick up the pin lying near the head. Give your child a bottle of milk.
Switch to the screen on the right, examine the suitcase lying on the floor under the wall. Take the hacksaw and fabric from the suitcase. Return to the screen with the baby and use the cloth to swaddle Laura, the daughter of the woman in the dress. Use a pin to secure the diaper.

Take the dirty diaper, return to the previous screen and look at the Win a trip to Rust Lake poster hanging on the wall. Examine it, switchto the grate in the floor to see the key. Use a hacksaw to cut the rod. Use the rod on the key to move it to the side. Take the key.
Go to the screen on the right to see the train. When he leaves, switch even further to the right to find a ticket office. Examine the closed cash register window. Look at the trash can on the right. Throw away the diaper and set it on fire using matches. When the tank breaks, pick up a spatula.
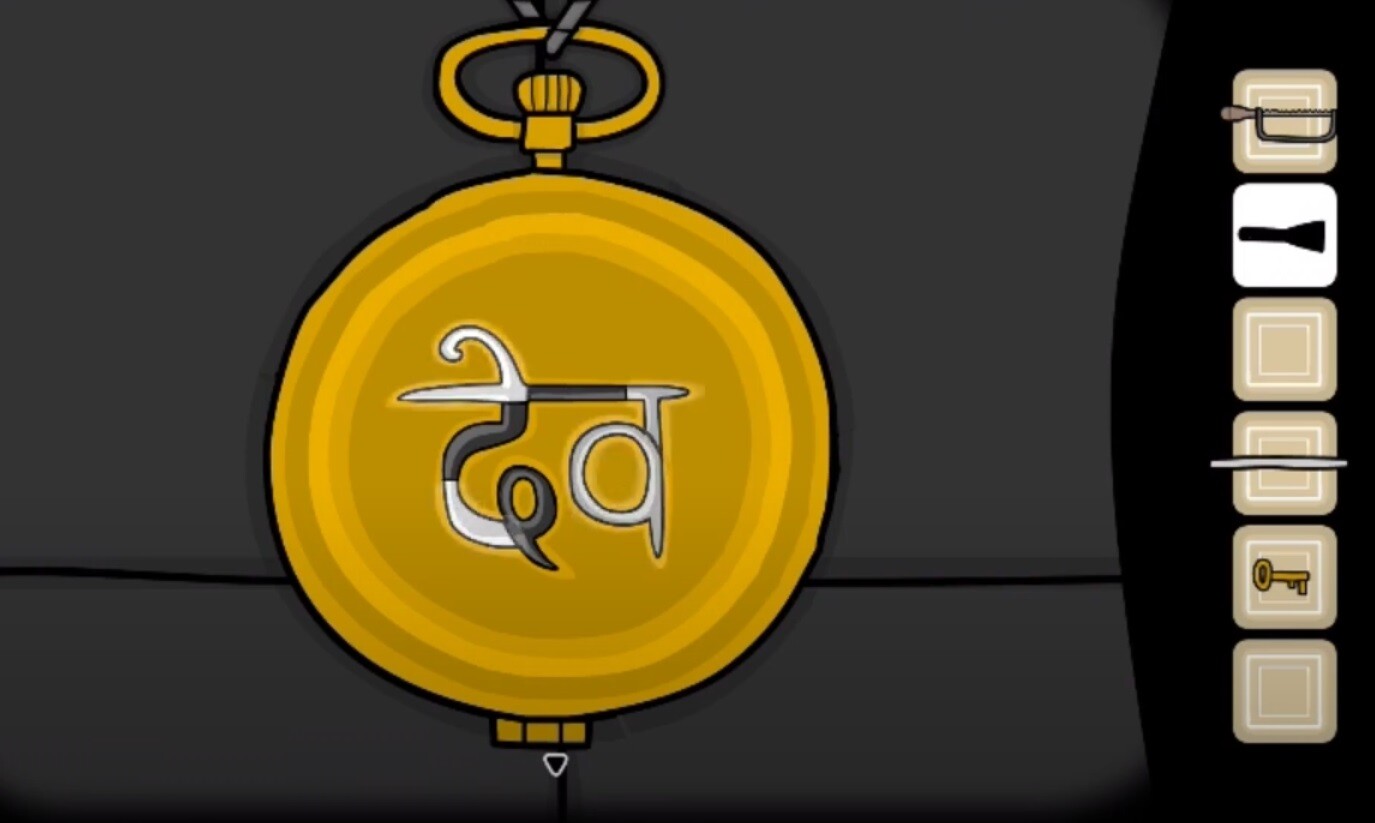
Return to the screen with the bars and poster. Use the spatula on the poster to see the actual inscription — The Future is Coming. In fact, you are interested in the symbols located under this inscription. Remember them, return to the woman and examine the gold watch hanging on her neck. Activate parts of the picture according to what you saw on the poster. See screenshot below:

The gold watch will open and you will see the time 10:15. Move to the platform, click on the clock and set this time. The train will arrive and you will see the controller. Click on the small pocket to get a coin . Return to the cash register, use the key on the lock, pull the door up and see the cashier. Wake her up using the twig. Give a coin, take the ticket and give it to the ticket inspector on the train.
When you see Mom and Laura, click on the metal plate under the name of the station. Use a spatula to remove old gum . Apply the gum to the girl's mouth. When she blows the bubble and it bursts, you will get chewed gum. There are two stained glass windows at the top, and you need to solve a Tag puzzle to get the whole picture. But so far you don’t know what exactly this picture should be.
Go to the screen on the right and examine the Holidays, Small to Large poster. Click on it several times so that the man lowers the poster, his hat flies away, the kite flies away, the camel flies away, the plane flies away, the pyramid collapses, the sun goes down. When all this happens, a key will appear in the upper left corner. Take it with you and move to the right, onto the platform. The train will leave.
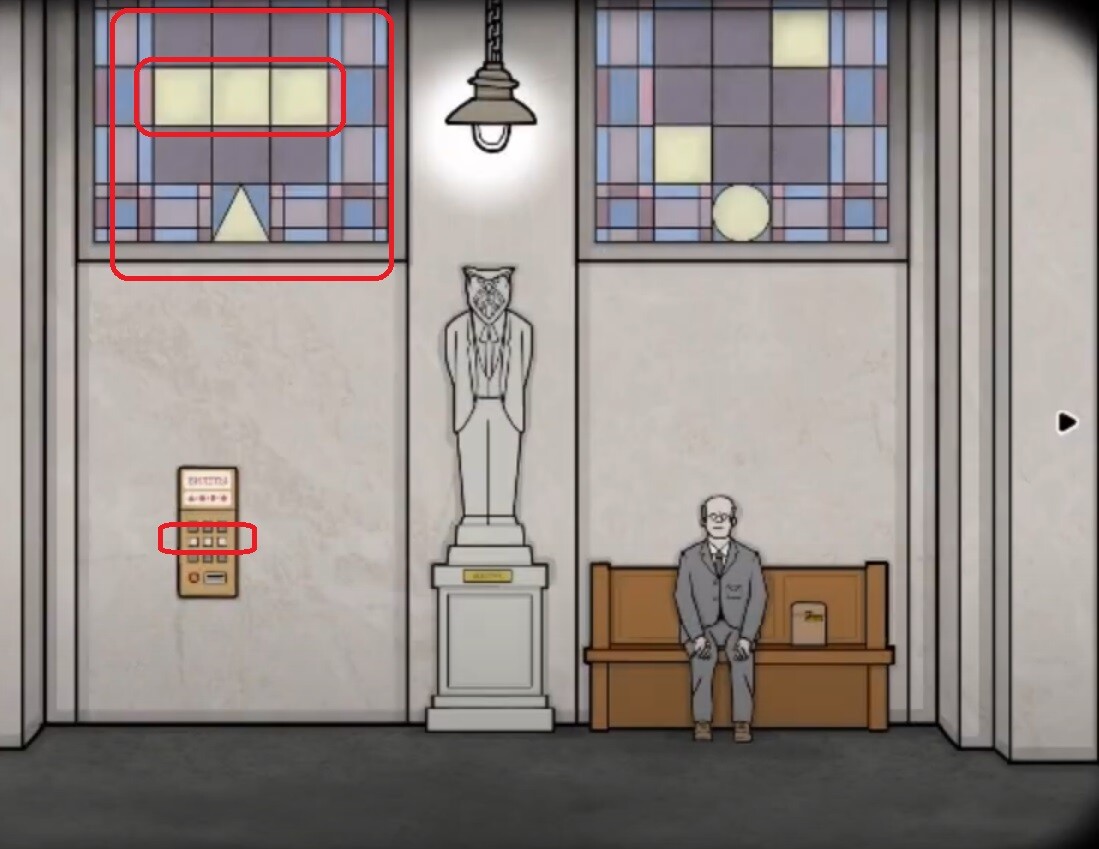
Move to the right to find a man sitting on a bench. A girl is also hiding behind the bench. There is a poster on the floor on the left. Pick it up, then click on the girl who is hiding behind the bench. You can try to start a conversation with the man, but he will be uncommunicative. Examine his suitcase. To open it, you need a four-digit code. On the left side, on the wall hangs a cash register with tickets. Pay attention to the hint of geometric shapes. You need to add a triangle, a circle and a rectangle, and then take away the rhombus. There are a total of 9 buttons on the cash register, in a 3x3 grid. Look up at the windows and see the same grid. Some of the squares are highlighted, and at the bottom of each window there is a geometric figure.
For example, on a window with a triangle, three squares in the middle row. When you see this, switch to the cash register and press the three buttons in the middle so they light up. Everything is as in the screenshot below:

Look at the window on the right, with the circle. The lower left and upper right squares are highlighted on it. Activate them on the cash register (after all, in the formula, the triangle is added to the circle). Return to the screen with the newsstand, behind which the girl is now hiding. But you are interested in the two windows on top. There is a rectangle on the left window, and also highlighted squares in the upper left and lower right corners. The right window shows a diamond that needs to be subtracted. That is, you need to remove the squares depicted on it from the cash register. In general, the whole picture will look like this:

Collect your ticket and return to the newsstand screen. To the left of the poster there is space for another poster. Place the chewed gum and glue the poster you found earlier (read above). You will see the inscription Smile. Click on the smiling woman's mouth. Then will you need tap to eyes, the bracelet on right hand, hair and eyes again . When the knife appears, you will see a message with a phone number — 53114.
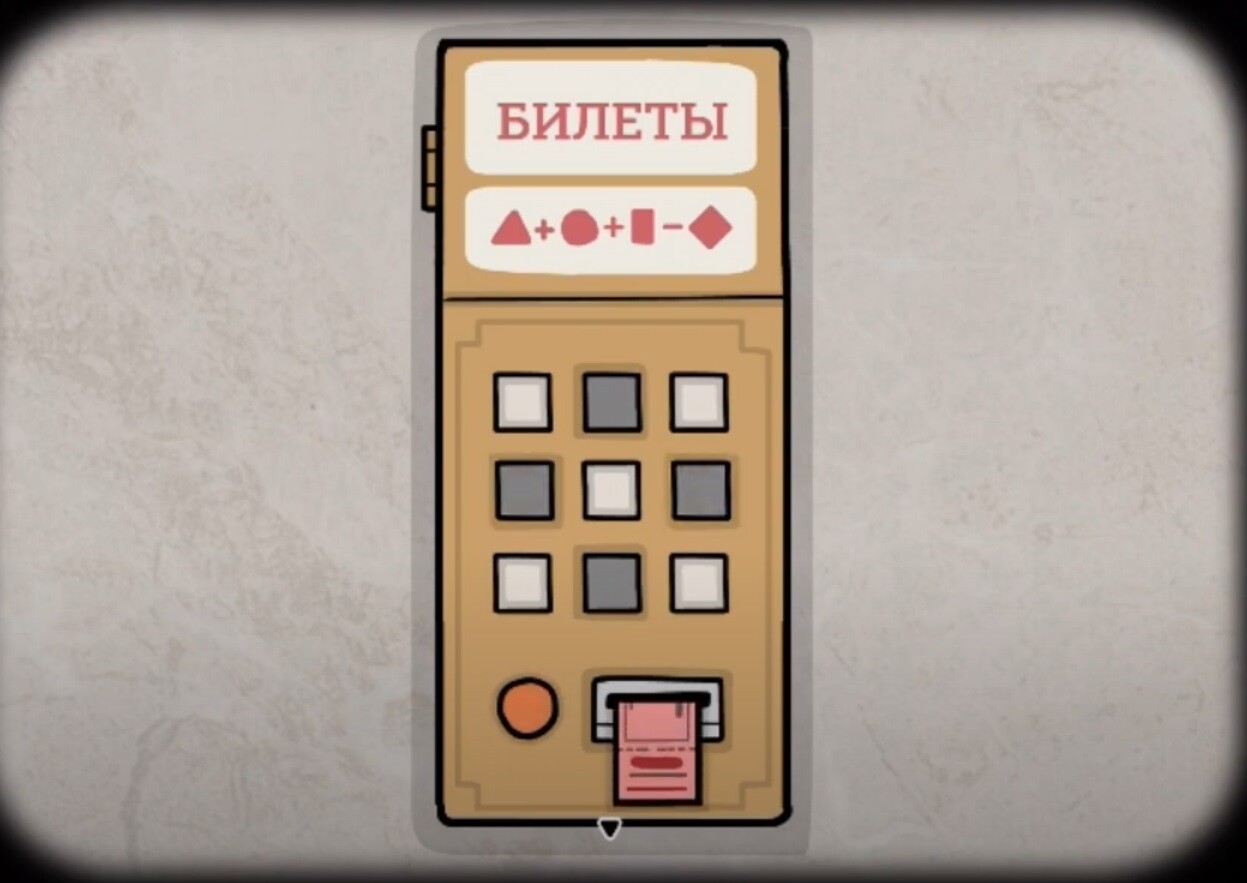
Click on the girl hiding behind the newsstand. Move to the screen with the man and examine the head of the statue (owl). Click on the hiding girl. Then follow the screen with the newsstand. The girl will stand in the center, holding a tile in her hands. Take this tile from the stained glass window.
Return to the screen with the woman. Examine the window at the top right and use the found tile. You can click on each tile to rotate it. The final drawing will look like this:

You will receive a handle. Return to the newsstand, place the crank in the hole on the left and turn to open the newsstand. Take the newspaper and give it to the man. Examine the newspaper and place the inscriptions correctly:
Immediately after this you will be able to take a coin out of your jacket pocket. Return to the phone screen and open the door using the key. Remember the phone number from the poster? Dial 53114 after tossing a coin. Go back to the screen with the man and click on the two eyes of the owl (statue). Look at the bottom of the statue, under the MR OWL sign, and use the rod to open the niche. You will see the code 8827. Enter it on the suitcase next to the man and press the square button. Take the camera. Return to the newsstand screen and give the camera to the girl. Click on the camera in the girl's hands several times until she screams.
Switch to the screen with the woman, and you will see a monster that will kidnap her. After listening to him, move to the platform. The monster will leave with the woman on the train. Pick up and look into the fallen bag and take out a gold watch, a screwdriver and a letter from Rose. Return to the newsstand screen, look at the panel on the lower left and use the screwdriver to remove the bolts. Take the glass panel, return to the screen with the phone and apply the panel to the left window. Collect the picture:

You will receive a clock hand. Move to the screen with the statue and examine its lower part. A girl is hiding inside. The film will fall out. Pick it up, go to the newsstand and put the film in the box on the left (inside the kiosk). Return to the platform and fast forward 20 minutes. Having done this, visit the newsstand again and take the envelope from the box in which the film was placed. Examine the photos to find the correct time of 16:05. Go to the platform and set the clock for this time. Show the ticket inspector.
Talk to the girl. She will say that someone stole her photos. Examine the ticket vending machine. Move to the screen on the right to see four schoolchildren. There is a tin can lying on the floor. Use the screwdriver to get a sausage. Move right twice, past the platform, to see four more schoolchildren. A boy with glasses holds a book. He promises to give something in return for helping with the book. Click on the book and you will see school records of 9 students. Their names are mixed up because under Laura's photo is Alex's name.
Move Laura's photo above her name to the lower right corner of the diary. Close and click on the girl in the middle. Look in her pocket, open the note. You will see one schoolboy in love with another schoolboy. Open the diary again to find out that Sam is in love with Johnny. Find the photo of Sam (the red-haired boy) and place it in the right place. Do the same with the photo of Johnny (the blond boy without glasses).
Return to the screen with Laura and examine the piece of paper lying on the floor. Click on the top of it. In the end, you must collect and receive a paper airplane. Switch to the screen on the right. Examine the two pockets of the girl with pink hair. One of them will have an earring. Return to the boy with the diary. Look into it. There is an allegation that Frankie stole something from Alex. Alex is a girl with one earring. It is the same in the photo, so place it in the right place. Frankie is a girl with red hair.
Close the diary and try to give a sausage to the blonde girl next to Alex. She will spit it out (the sausage will end up on her head). Tess hates sausages - she is a blond girl with a bob haircut. Return to the screen with Laura and pick up the peanuts from the bag. Move to the right and give the peanut to the blond guy with glasses. His lips puff up, that's Jimmy. Then you don’t have to check anything, but simply change the photos of Bobby and Hank. Or throw a paper airplane at a girl with two braids. And Hank is the owner of the diary.
Here is the correct arrangement of student photos:

Then give Hank (the boy with the diary) peanuts, paper airplane, sausage. You will receive a worm. Get away from Hank. On the same screen, at the top there is a nest with a bird. Give her a worm to make her fly away. The egg will fall on the student's head, causing him to drop his briefcase. Look into it, then use a ruler to measure the lollipop, sharpener and pen. You will get the following sizes — 637. Enter this code on the notepad to open it and pick up photos of Laura. Go back and give Laura all the photos. She will say that the train will arrive at 14:45. But you don't have a ticket!
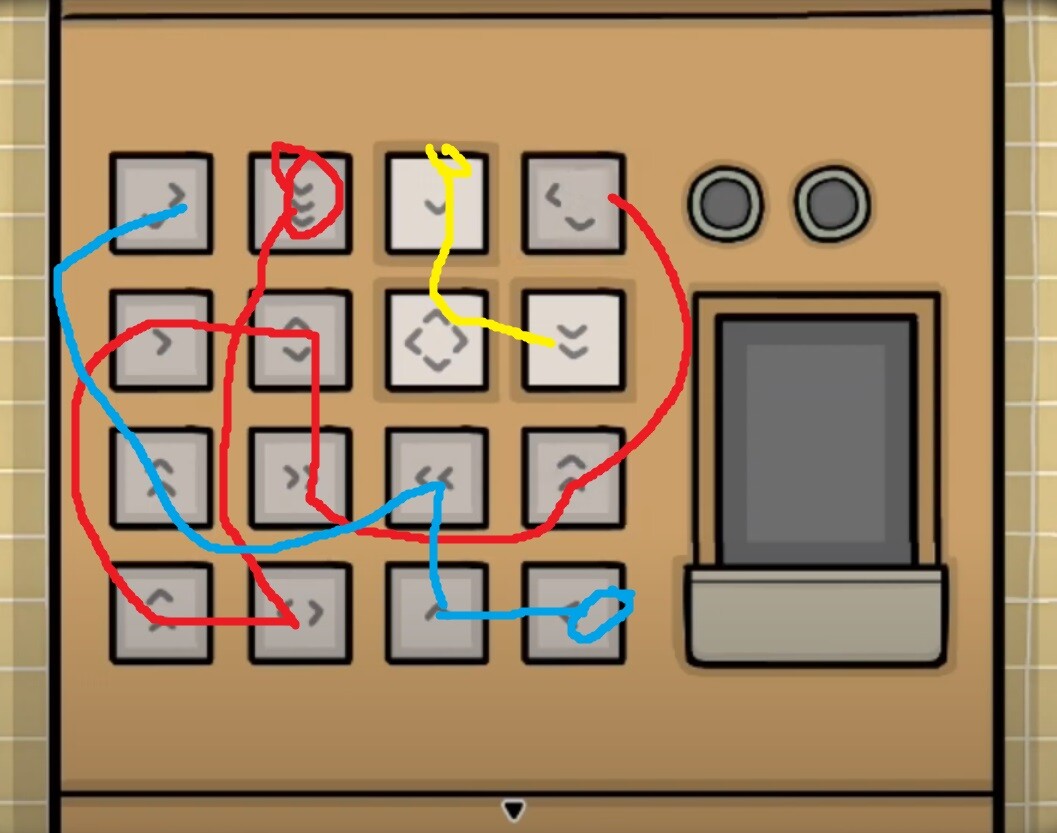
Examine the cash register. You must activate all buttons. The arrows on the buttons indicate which direction you can press the next button. If there are two arrows, then you must press the second button from the current one. The screenshot below shows one solution:

Take your ticket, set the time to 14:45 and show it to the controller.
Look at the diary in the hands of the girl sitting on the bench. If you talk to her, will she say that she wants to finish the drawing. Open the drawer on the left, take a pencil and a piece of sausage. Look in the diary, put a pencil in your hand, click on it and take the line that the girl will draw. Go right to check out the Food and Drink kiosk. You have no money. The electrical panel is locked, you need a key. Open the hatch in the floor and pull out the branch.
Switch two screens to the right to see a man with a blowpipe. Examine the poster with the singing woman. Place your finger on her mouth to see the notes coming out. Click on the pipe in the man's hands. Press the keys from left to right: 1, 2, 3, 1, 2, 3. If everything is correct, he will start playing until the fish flies out. Examine the fish, click on it and pick up the fish hook.
Return to the food stand and look at the hatch where you got the branch from. Attach a line and a fish hook with a piece of sausage to it. Click on the baited rod to catch the mouse. She will run to the right. Follow her and look at the mouse next to the tile in the wall (under the poster of the singing woman). The mouse will run into the hole, but a brochure will fly out. Read it. You will see the time — 5 o'clock. Return to the platform and set the clock to 5:00 (17:00).
The workers will arrive. Click on any man. He will say that you need a man in a red hat. Switch to the kiosk screen and you will see a man in a red hat. He will point to a colleague with brownwith a suitcase. Look for this on the screen with the clock (platform), on the left. Look in his pocket and take the glasses. He will say that the person wearing the helmet needs glasses. Look for this man on the screen with the name of the station and Laura. Give him glasses. Return to the platform, look at the three people in the center and talk to the tall smiling man. Take the tie out of his pocket. Follow Laura to the screen where there is a man without a tie. Hand him the tie. He will ask to talk to a man in a green tie. Move to the screen with the kiosk and hatch where there is a man in a green tie. He will say that you confused him with his twin. Switch to the screen with the poster and find the same man. But he will be wearing a gray tie! Take the lighter out of your pocket.
When all the men have left, a man in a green jacket will remain on the platform. He will ask you to buy coffee for the woman and a sandwich for him. Take the money, go to the kiosk and buy a coffee and a sandwich for two $10 bills. Pass Laura the coffee and take the cigarette out of the cup. Give the man a sandwich. Move the cheese, bread and tomatoes to remove 5 worms from the sandwich. Only after this will the man eat it (automatically). Pick up the bread crumbs . Return to the kiosk to see a man wearing a hat on the side. Give him a cigarette, light it with a lighter. He will steal your watch, knivesku and a screwdriver.
A bag will appear on the floor. Open it. It will contain an apology note and a paperclip that you must pick up. Use the paperclip on the lock on the electrical panel. Connect the wires as follows:
What's the point? Initially, the numbers on the screen were 361. Now look at which sockets need to be connected to get all three numbers from the symbols shown.

You will see a loudspeaker with notes coming out of it. Return to the man with the blowpipe and press the keys in the following order (from left to right): 1, 1, 2, 2, 3, 3. When the bird flies out, return to the screen with Laura. A girl and a man are sitting on a bench. Look at the bird and give it some bread crumbs. She will sing and you will see the notes again. Return to the man with the blowpipe and play the following notes: 3, 3, 1, 3, 1, 1. Collect the ticket. Go to Laura, look in her diary (lying on the bench) and scroll through it to page XI. There is a clue here: the minute hand is pointing to the tree, and the hour hand is almost catching the dark soul. VernGet on the platform and set the clock to 15:45 (III — drawing with a dark soul, IX — with a tree). Show your ticket to the controller.
Click on Laura. She wants Bob to leave. His train is at 4 o'clock. Take the clock hand out of the cardboard box (standing under the bench). The red locker is locked. Follow the screen to the right. There is a man behind bars. There is also a vending machine for snacks. Go right and set the hand to the clock. Set the time to 4:00. Bob will leave.
Pick up your wallet, take out a coin and $10. There is also a business card for The White Door (a reference to the game of the same name). Switch to the screen on the right. There is a dove on the floor. There's nothing to do here for now. Go back to the snack machine and place the coin. You will receive 100 credits for your purchase. You need to select products so that you get exactly 100. Choose snacks for 20, 45 and 35. You have three bags. You need to distribute items among them. So, a package with a picture of a dog will contain animals, a bicycle will contain vehicles, and the third will contain food and drinks. I think you can figure it out without my advice, but still:
Go to the pigeon and use the liver on it. Place the crumbs in the correct order (from right to left): yellow, yellow, yellow, red, white, yellow, blue/gray (one of these), white, white, red, white. Launch the dove. Only white crumbs should remain.

Click on the pigeon on the trash can, go right to Laura and click on the pigeon on the chandelier. Return to the platform, the pigeon is sitting on the counter. Scare away and pick up the key. Return to the vending machine screen and open the grate.
Talk to the man. He asks you to leave the money under the bench and return at 9. Move to the screen with Laura, place the money in the cardboardbox. Return to the platform and change the time to 9:00. Look under the bench, open the package. You will only find a hacksaw. He liked the watch. But there was also a screwdriver!
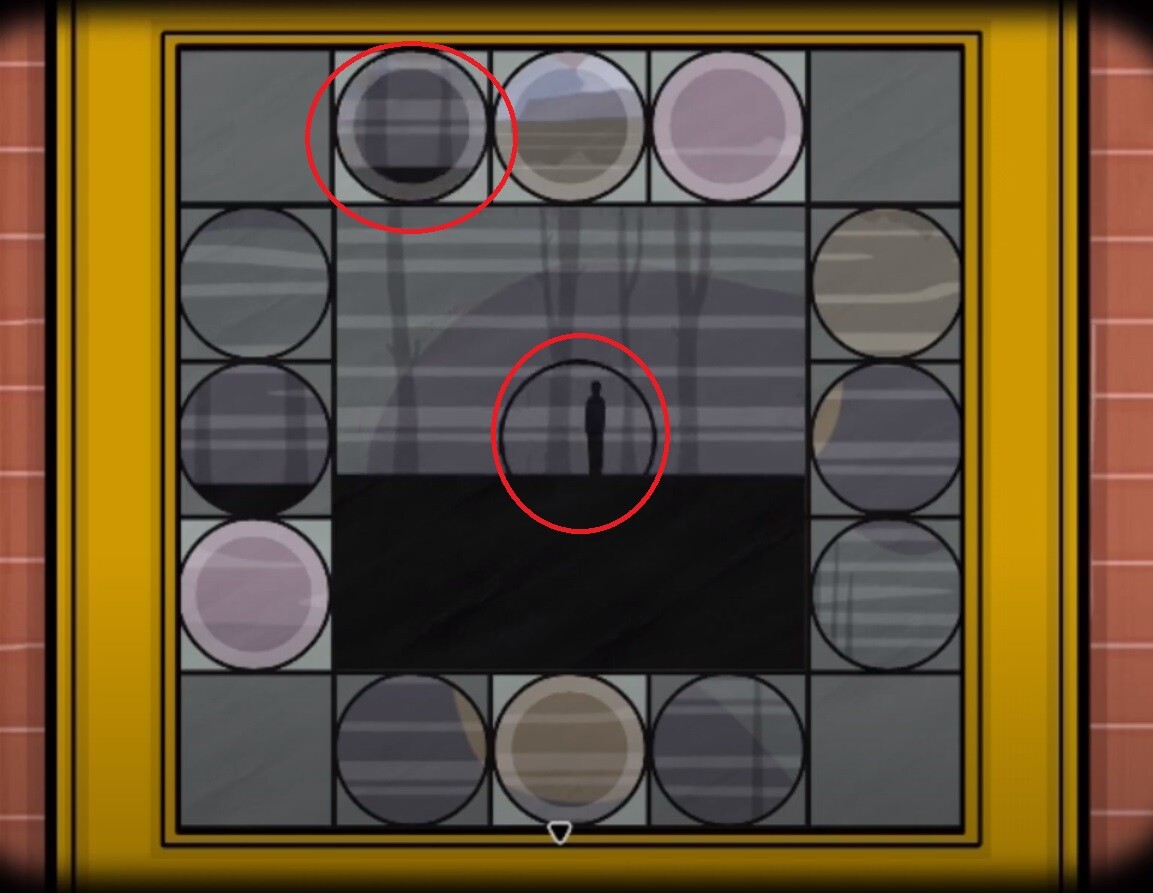
Use the hacksaw on the lock on the red cabinet near Laura. Take out the tile (canvas), return to the screen with the trash can and examine the picture. Place the canvas at the bottom, towards the two round holes. In 12 circles some parts of the landscape are shown. You must find them and activate them to make different shapes appear. The activated circle will have a more transparent circumference. Example in the screenshot below:

So you need to find 12 positions for all circles. When this happens, the trash can will fall. Examine the dropped items. There are two parts of the note that give a hint: you need to make pairs.
Correct answer:
Read the resulting letter. You will receive a tablet. Give Laura the pill. Then you need to switch between screens and select the desired items and objects. Each time you need to click on Laura to know what she is dreaming about.
Correct sequence of actions:
Examine the lying girl and take the ticket. Examine the painting lying on the floor near the girl. Take a paint brush. Return to the platform and use the brush on the red paint (the remains of the bird). You will receive a brush with paint. Return to the portrait near the girl. Cover it with red paint to see the correct time. Set the clock to 19:55 and give your ticket to the ticket inspector.
Switch to the screen on the left to see the Dead Woman poster. Choose a mount. Switch to the screen where there is a cabinet with a chain and lock. There is a box below. Hack it using a crowbar. You will receive key #6. Return to the poster and open locker #6. Take the bucket.
Return to the screen with the locked cabinet and chain. There are holes and white stones on the wall. You must place white stones on the holes where the butterfly flies out. In this case, the installed stone sets the direction in which the butterfly will end up. Look at the screenshot below:

Return to the black pile on the start screen. That's where the butterfly flew. A creature will appear from the pile. Take the key and open cabinet No. 7. You will get ticks. Cut the chain using pliers on another cabinet. You will see a tied up man who stole your watch. Examine his face and remove the duct tape from his mouth. You will receive a piece of electrical tape. Return to the screen with wires. Apply electrical tape to the broken wire above the control panel. Open the panel and turn up the two toggle switches on the left side. The rightmost toggle switch will turn to the left, the third and fourth toggle switches will point down.
Go to the screen with the barrel and look at the wall panel. The light should be on. Turn the toggle switch and take the red valve. Install the valve on the faucet, open it and place the bucket. You will receive a bucket of water. Find a platform with bars in the floor. Open it with a pry bar. Pour out the water and take away the clothespin. Go back to the barrel and hit it with the crowbar. Set fire to the spilled oil. Refill the bucket with water and put out the fire. You will receive a wire.
Return to the first screen and rewind another cable break with wire. Set the toggle switches as follows (from left to right): up, right, up, left, down.

Douse the man with water and lower the lever to apply electricity. Examine his left hand to see the code. Apply the clothespin to the nipple. Examine your right hand to see other symbols and numbers. Apply the paperclip to the other nipple. He will say that the key is behind the dead woman's hand. Go to the poster with the dead woman, tear it up and take the key. Open locker #8. Take your suitcase. You need to enter a code.
When you tore the poster, you got a piece of duct tape. Already the second one. Go back and connect the third break in the cable. Now you can apply electricity to the lamp. Do this by arranging the toggle switches as follows (from left to right): up, right, up, up, right. When the light turns on, you will see images. Compare them with what you see in the man’s hands. Enter the code 4195 on the suitcase. Take the watch and give it to the black man. Select the parts that are shown on the wall. Just like in the first chapter! Follow to the platform and talk to the soul.
Switch screens to the right and talk to the soul standing in the forest. Turn right twice and you will see a tree. Approach him, talk to the woman and the old woman. Take a few steps back from the tree, turn towards the soul. You will see how the child grows up and so on. Get on the train and watch the final cutscene.
To be continued...
An incredible success for the studio's debut project.
In short, the company is aware of the problem and is solving it.
It will be an animated prequel series.
A free drone piloting simulator designed for schoolchildren and teachers. The game develops drone piloting skills in a safe virtual environment and is available on Steam.
All materials on showgamer.com are protected by copyright. Partial copying is permitted with an open (for search engines) link. ShowGamer (2015)


 Our YouTube channel
 Our VK group

.jpg)
